Are you stuck with AOL Error AC-3101? If yes, then you have reached the right destination. In this blog we will give you a brief about AOL Error AC-3101 along with the accurate troubleshooting methods.
Generally, the users might confront this error due to incorrect configuration of the system files. In other instances, it may appear due to damage in the Windows Registry.
There are plenty of other factors that might evoke this error, we have explained all of them in this post below. Getting issues while dealing with AOL Error AC-3101 and want quick assistance?
If that’s so then dial +1855-356-3099 and get your issue resolved under expert’s supervision.
Related: Troubleshoot AOL Gold Flash Player
Reasons That May Give Rise To AOL Error AC-3101
It is crucial to know all the root causes that may trigger AOL Error AC-3101. This is so that you can get a clear vision of how to fix the error without the cause of the issue.
Here, we have elaborated on all the factors responsible for the issue; have a look at them.
1. You might have experienced an incorrect installation of the AOL application.
2. The antivirus program may be creating issues while installing AOL.
3. Corrupt Windows Registry is also one of the reasons that could result in AOL Error AC-3101.
4. Sometimes, it may occur due to corrupt software files.
Points You Must Consider Before Resolving AOL Error AC-3101
Here, we have listed some of the essential points that the users must know to deal with AOL Error AC-3101 easily.
1. Make sure you are well-connected with a high-speed internet connection.
2. You have installed the newly launched version of the AOL application on your device.
3. Verify that there is proper configuration of the AOL email.
4. Also, you must examine the AOL mail server status.
What should you do to resolve this Error Quickly?
Now, that you have understood the root causes behind the AOL Error AC-3101, move towards the troubleshooting part.
Solution 1: Proper Installation of AOL Desktop Gold
As mentioned above, users might sometimes end up with Error AC-3101 in AOL due to improper application installation. Therefore, it is better to install the AOL application properly by applying the steps below to fix the issue.
1. Firstly, you must ensure you have downloaded the latest version of the AOL Desktop Gold on your device.
2. You may download it through the link from the AOL Sign-in confirmation window.
Go through the points below to accomplish the download process.
You are supposed to look into your Inbox for the mail with the subject line “Get started with AOL Desktop Gold”.
2. Then, open your email and hit the Download AOL Desktop Gold or Update Now option.
3. Move to the downloads folder and opt for the Save option.
3. Once you have successfully downloaded the AOL Desktop Gold, install it. For that, double-tap on the file named “Install_AOL_Desktop” icon from the desktop to open it on your device.
4. Afterwards, hit the Run option followed by the Install Now option.
5. Finally, relaunch your Windows device once again to install AOL Desktop Gold.
Related Page: AOL Mail Service Error
Solution 2: Utilize the Reimage Repair Tool In AOL:-
Below, we have described some of the simple steps to get rid of this error quickly.
1. In the beginning, access the Reimage Repair Tool and examine the desktop screen to trace the file.
2. After this, initiate the installation by double-tapping the downloaded setup file.
3. Next, it will open the User Account Control window on your screen. Herein, you are required to opt for the Yes option to proceed further.
4. After this, initiate the program, and then it will display the Welcome screen on your screen.
5. Now, you should activate the automatic scan within the repair tool by tapping the Install button.
6. Once the installation procedure is finished, hit the Start Repair option.
7. Finally, relaunch your computer to restore the mandatory changes successfully.
Solution 3: Verify AOL Application Compatibility:-
To work any application on your device smoothly, you must install the AOL application as per your preferred device. Thus, if you are using an AOL application that isn’t compatible with your device, it is obvious that you might end up with AOL Error AC-3101.
However, to overcome this issue, ensure that you have downloaded the appropriate version of the AOL Desktop Gold application that best suits your system specifications.
Solution 4: Remove the Unwanted Cache Files
Corrupted cache files are one of the major issues that might trigger various system issues. If your AOL application is compatible with your device, you must try fixing the issue to delete the cache files. You don’t have to think anymore about deleting these files, it won‘t hamper your data, it will remain safe.
Therefore, to fix the issue, follow the instructions given below.
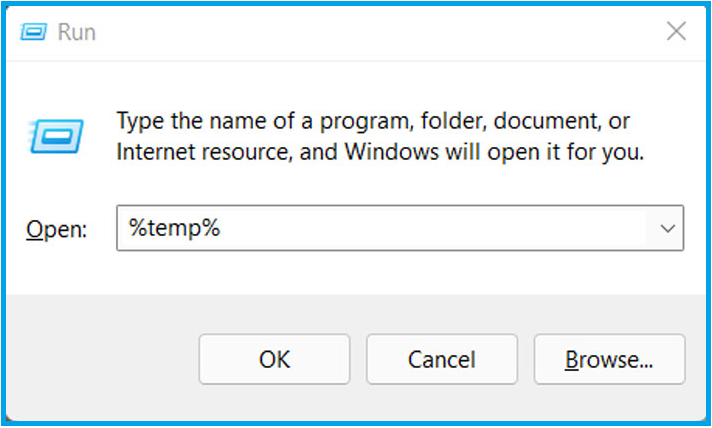
1. In the first stage, press the Windows + R keys together, insert the “%temp%”, and hit OK.
2. After this, you have to choose all the files shown within the temp folder on your screen.
3. Finally , delete all the cache files you selected from your device and verify if you still receive the AOL Error AC-3101.
Solution 5: Run the Disk Cleanup Of your Device
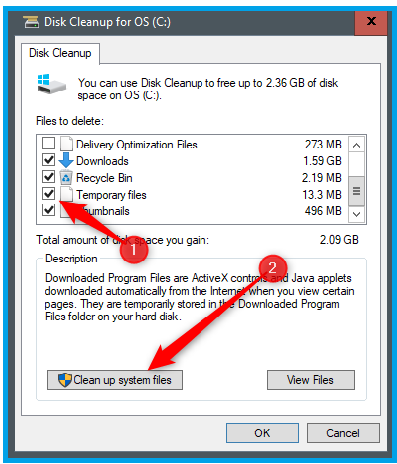
Disk cleanup is used to clear some of the temporary files occupying your device’s space.
It will help you in fixing AOL Error AC-3101 due to corrupted temporary files.
1. Firstly, locate the Disk Cleanup from the available search results and then click on it.
2. After that, choose the drive you wish to clean and hit OK. Alternatively, you may apply the procedure one after the other as you may get the corrupted file anywhere. So, begin the disk cleanup from anywhere.
3. Thereafter, choose the files you want to remove from the “Files to Delete” column. Here, you must mark the “Cache and Temporary Files” option.
4. End the process by hitting the OK button to save the required changes.
Related Page: Use AOL Mail Smart Feature
Summing It Up!!
So, here we sum up this post and hope you might find it beneficial in resolving AOL Error AC-3101. However, if you still receive issues while fixing the error, communicate with our professionals via the live chat facility.