All posts by admin

How to Fix Time-Related Error on Firefox for Secure Websites?

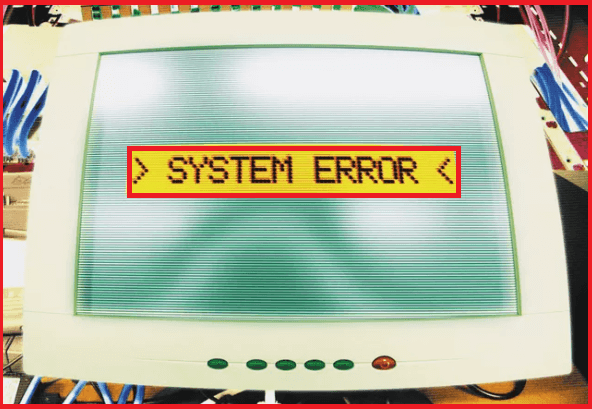
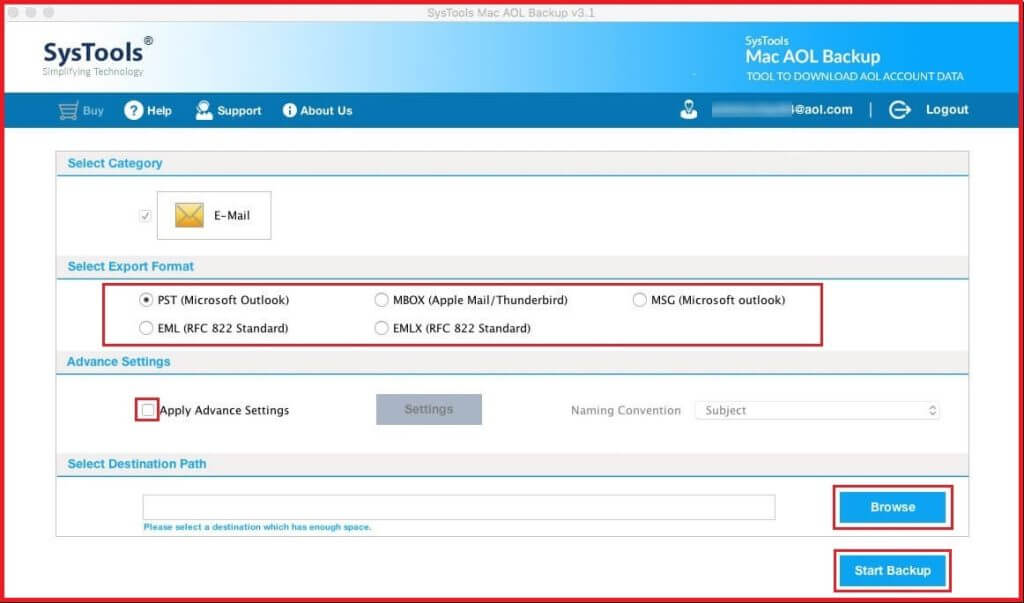
Security is a major concern for any website in order to be secure and show the user/browsers that they are secure to visit. One such measure is the use of security certificates (https://), which creates the authority that the website is safe to visit. However, using security certificates can sometimes trigger some error due to which the website cannot load on the user system. Common error includes Firefox time related error where the validity period of the website does not match with the system clock. As a result, the message displays on the screen “Connection is Not secure.” Common measures can be taken to fix these, like changing the system’s date and time.

Dial Toll Free Number: +1-855-356-3099

Here, we will tell you how to fix time related error on Firefox, along with other common issues that user faces. Read this blog post till the end to know more to Firefox time-related errors.

Some Common Time-Related Errors Users Encounter in Firefox

Usually, with Firefox, in case of the majority of the errors, a common message appears on the screen: “Connection is Not Secure.” However, in order to check whether it is a time-related error, you need to click on the “Advanced” option and then look out for the following Time related error codes on Firefox:

  • SEC_ERROR_EXPIRED_CERTIFICATE
  • SEC_ERROR_EXPIRED_ISSUER_CERTIFICATE
  • SEC_ERROR_OCSP_FUTURE_RESPONSE
  • SEC_ERROR_OCSP_OLD_RESPONSE
  • MOZILLA_PKIX_ERROR_NOT_YET_VALID_CERTIFICATE
  • MOZILLA_PKIX_ERROR_NOT_YET_VALID_ISSUER_CERTIFICATE

Along with that, another message appears on the screen: “Your Computer Clock is Wrong.”

Why is there a Need to Fix Time Related Error on Firefox for a Secure Website?

Most websites use certificates for security concerns. These update certificate for secure websites are valid for a certain time period. Mismatching between given certificates and the system clocks can trigger an error and display the message “Your connection is Not Secure.”

How To Fix The Update Failed Error Message

How to Troubleshoot Firefox Time-Related Error for Secure Websites

The following measures can be taken in order to fix Time Related Error on Firefox.

  • Fix the system Date and Time settings.
  • Contact the Website Owner
  • Bypass the warning and proceed further with the website.
  • Update Certificates for Secure Websites.
Correct Your System Clock to the Current Time to Fix Time Related Error on Firefox

In order to fix Firefox time-related errors, you need to resolve the correct date, time, and time zone. This can be done from the Window Taskbar or the system settings for which the steps are listed below:

  • In Windows 11 or 10, press the window button and then type “Date/Time” in the search bar.
  • On the next page, hit the option” Date and Time Setting” on the left-hand side.
  • Now, hit the option “Sync Now” in order to synchronize your computer’s time with the time server.
  • In order to update the time zone, you need to select “Time Zone” and then select your preferred time zone.

The above method is to update the Date and Time. However, sometimes the option “Sync Now” is not active (Grayed Out). In that case, you need to follow the given steps:

  • Look for the option “ Set Time Automatically” and then toggle the switch next to it and set it to disable Time settings.
  • Now, you need to manually set the Date and time and fix time zone setting of your system.
  • Locate the options “Set the Date and time Manually” and “Set Time Zone,” through which you can set the correct time in your system.
  • Click on the Save button to make further changes.
Connect with the Website Owner

In case the time and date are correctly synchronized, then the actual problem that is triggering this error is the expired certificates that the website owner needs to renew. You can contact the website owner and, through mail or any other option, tell them regarding the same.

Detour the Warning Message

Although not recommended, you can just ignore the warning about insecure connection and proceed further to the website. However, we only recommend this step when you trust the website to be free of any malware or any suspicious activity. Following are the steps to bypass the warning in Firefox:

  • Whenever any warning message appears restricting you from opening the website, you can look for the “Advance” option. Click on it and then select “Add Exception.”
  • Hit the option “View” and then “Confirm Security Exception.”
Common Causes Which Trigger Firefox’s “Connection is Not Secure” Error

While time and date can be a common reason why a secure connection cannot be established with a website, plenty of reasons are why users cannot have access to a website. Some of them are listed below:

Virtual Private Network (VPN)

A VPN is a virtual private network that creates encryption in your network in order to protect your private data. Through this, you can safely connect with a private network. A common error message that displays on the screen is “PR_END_OF_FILE_ERROR.”

Altered SSL Settings on the System or the Browser

In case the user has modified their SSL setting in either browser or system, it can trigger an error that restricts the establishment of a connection with the website. The reason is that the modified SSL settings can lead the browser to implement a cipher version, which is sometimes not supported by both the browser and the system.

Corrupt Firefox Profile

A corrupted Firefox profile due to synchronization issues between the desktop and the mobile browser can also trigger the Firefox Browser connection failed error.

Antivirus or Firewall Interference 

Any third-party security software can sometimes detect any website to be suspicious and thus restrict it from loading. To fix that, you need to disable the antivirus temporarily.

Basic Troubleshooting to Avoid Firefox Secure Connection Error

While correct date and time settings can avoid Firefox real-time errors for a secure website, various precautionary measures can be taken in order to totally eliminate connectivity errors in the Firefox browser. Some of them are the following:

Clear Browser History on Firefox

The first and foremost security measure to avoid general issues is to keep the browser history clean. Detection of any unwanted or suspicious website in your browser history can trigger security alerts, thus denying the establishment of a secure connection in Firefox. To fix that, clear the browser history steps, which are as follows:

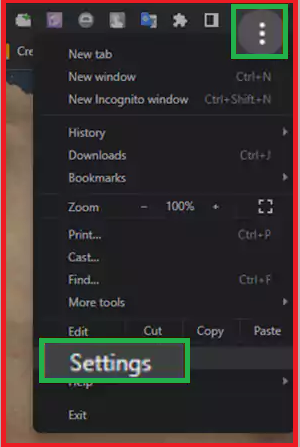
  • Open the Browser, where in the top right corner, you can find the three menu options. Click on it.
  • From the drop-down menu, select History. The shortcut to directly access history is “Ctrl+H.”
  • On the left-hand side of the page, you can find the option “Clear Browsing History.”
  • Click on the option and select the time range or “All time” and then Hit the option “Clear Now.”

This will clear the browsing history in the Firefox. In order to clear the browsing automatically, follow the given steps:

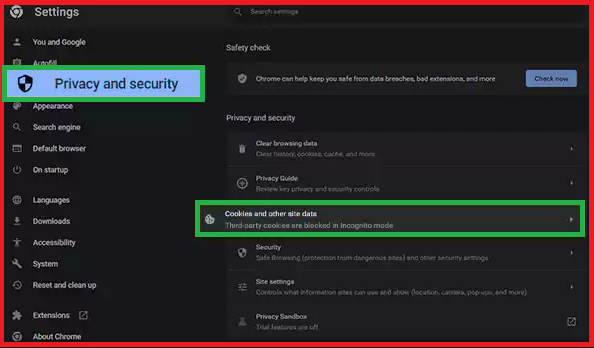
  • Open browser settings and then select Privacy and Security.
  • Navigate to the History section, and under the “Firefox Will,” select the option “Clear history when the browser closes.

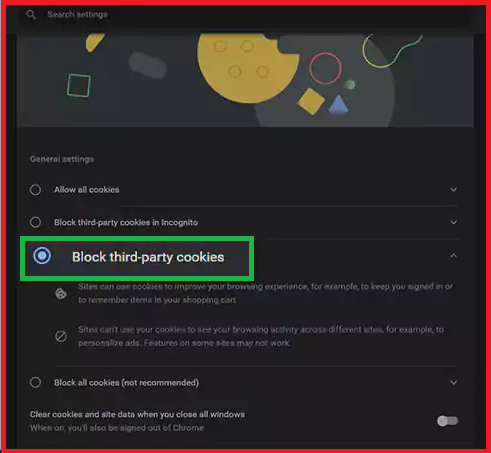
In order to clear the Cache, under the Privacy and Security Panel, go to the Cookies and Sites Data and then Hit “Clear Data.”

How to Fix 403 Forbidden Error on Mozilla Firefox?

Temporarily Disable the Antivirus

Interference from third-party security software can sometimes affect the browser functionality. Thus triggering multiple errors. To fix that, you need to disable the Antivirus from the system settings. While it can resolve the error, it is not recommended concerning system security.

Reset the Internet to Fix the Firefox Secure Connection Error.

Internet connectivity might be a reason for a failed internet connection. To troubleshoot that, switch down the router and remove all the connections. After that, wait for 2 minutes to re-establish the router and launch the Firefox browser again.

Connect with us to fix the Firefox Browser Issue

Well, that’s all from our side. We have provided all the information to avoid a Firefox error for a secure connection. Make sure you have a clear browser history, and the system settings are in synchronization with those of the browser. Along with that, you can also update certificate for secure websites. For any further assistance, connect with the customer through the Helpline number given below or use the live chat option to get an instant solution for not Firefox but any other browser available.

How to Cancel Adobe Subscription Without Paying Any Fee?

An Overview and Process to Cancel Adobe Subscription

Do you want to Cancel Adobe subscription for many reasons. Well, we will not dive deeper into the reasons, but we would rather discuss the many ways to cancel the Abode subscription. For starters, getting your hands on Adobe Suit is great as you can access many software-based tools such as Photoshop, Adobe Lightroom, etc.

Dial Toll Free Number: +1-855-356-3099

But, one day, you realize that Adobe does not provide everything you require for your business, so you make up your mind and decide that it is time to cancel your Adobe subscription. Well, we are here to break it down for you in the simplest way. All you have to do is follow the steps provided here, and you will be all set and free from any subscription.”

How to Merge and Split a PDF Files with Adobe

Brief About “Adobe” Software 

You must live under a rock if you do not know about Adobe software. Adobe Creative Cloud software is the best service provider for graphic designers, web designers, video editors, and cloud services. If you subscribe to Adobe Suite, you will have access to more than 15+ applications, including desktop & mobile services. Overall, it provides the best services for someone who works as a designer or edits pictures.

Now, canceling the Adobe Subscription is not easy; it requires more than one step to cancel the subscription. But if you follow the right rules, then you can cancel Adobe subscription.

You must know before canceling your subscription if you cancel your subscription at least 14 days before your purchase. If you manage to do that, you can get a refund on most of your plans. But, if you cancel your subscription from its time of repurchase, you may have to pay a certain amount, which will be a cancellation fee.

How Does the Procedure of Cancelling Adobe Subscription Work? 

Canceling an Adobe Subscription is relatively easy; all you have to do is follow some necessary steps to ensure the process is successful. Let’s not beat around the bush and get started with the methods-

  • To start with the procedure, navigate to the official website of Adobe website.
  • Once you are there, click on the Login option, and you will find a brief related to Adobe subscription.
  • Look through the given options and then tap on the Manage Plan option.
  • As soon as you have selected your plan, you will taken to the latest screen where, you will be asked if you wish to change your plan or want to revoke it. Choose the Cancel My Plan option to cancel your Adobe subscription without a fee.
  • Afterward, you will be asked why you left your Adobe Suit Creative subscription. Once you have selected your cancellation reasons, click on the continue option.
  • Next, the website will try to coax you to stay around for more, but if you have decided to cancel, you must click No thanks to move forward.
  • After this, you will see the result of canceling the Adobe subscription. In most cases, the users may have to pay a certain amount as cancellation fees.
  • Adobe will again try to make you rethink your decision, but if you have already made up your mind, click on the No thanks option again.
  • Lastly, hit the confirm button, and by doing so, you can cancel your subscription quickly.

Things to Think About Before Cancelling Your Subscription Plan 

One must pay attention to a few things before canceling their subscription plan. Once you have decided to cancel your Adobe subscription, you must understand that you cannot go back down this road ever again. Once you have canceled your subscription, there is no way of getting it back ever again. You cannot freeze or pause your subscription whenever you want, but there is an option for you to reactivate your account in the next 15 days of cancellation.

Apart from this, when it comes to payment and money, you must keep in mind that if you revoke your subscription services two weeks after paying the fees, there will be no refund for you. But do not be sad; look on the brighter side. The users can use the services until their due date after the cancellation. So, there will be no loss & no gain.

Canceling services does not mean that your account will be deleted. But that also does not mean that there aren’t any more consequences. There will be some consequences, such as less storage space and changing your plan to use Adobe Suite services in the near future.

What is the Procedure of Cancelling Adobe Subscription Trial? 

The trial version can benefit those who do not have a budget for a subscription but want to use Adobe Suit Creative Services before making the final commitment to purchasing a subscription. You can cancel your Adobe trial plan after trying it out for free for a couple of days. Here’s what you have to do;-

  • First, navigate to Adobe Creative Suite’s official website and then log in to your account.
  • Once you finish that, search for the plan you wish to cancel and then choose the Manage Plan option.
  • Next, cancel your official plan. However, there can be a situation where you are still looking for this option. If it’s the case with you, it means there is a problem with your payment, or your payment is on hold. The best option would be to wait 24 hours and then check again.
  • It would be best if you found a reason for your cancellation. Now, you have to find a reason from the given drop-down reasons.
  • Do not worry; follow the on-screen to help you with the rest of the cancellation procedure.

What is the Situation After Cancelling Adobe Acrobat DC Cancel Subscription?

The first thing that you will notice after canceling your subscription is that you can no longer access the features and options that come with Adobe Suit. As soon as you are done with canceling your Creative Cloud subscription, not only do you lose access to all the features, but you cannot access other services as well.

Apart from this, the overall storage will be reduced to 2 GB after the subscription cancellation. However, you can reduce in the next 90 days if you are over the storage limit. But you can lose it all if you have yet to reduce storage in the next 90 days.
As for other services, such as Lightroom, users can still save some of their work a year after their Adobe Creative Suite membership. But you can still access the services; you can still use Lightroom to download/save your files, so when the time comes, you do not lose.

On the other hand, users can save their Lightroom images on their local hard drive. Besides that, the users can also have the option to organize their images, import, print, and slide shows, and export their work. However, once your subscription has ended, you cannot access the Lightroom version for Mobile.

What is the Procedure for cancellation Fees and refunds? 

The overall procedure to Cancel Adobe Subscription is that the users may get a refund after their trial or membership cancellation. But this can only happen in some cases. The refund depends on various factors, such as the type of subscription and why you are canceling your plan. However, according to the cancellation policy, the users will be able to get a refund If they cancel their plan within 14 days. You must cancel your plan in the next 14 days for a refund.

You may even get access to your plan after canceling it if you cancel it within 14 days of the period.

What Should I Do If None of those mentioned above Methods Works For Me? 

If you have tried all the methods and are still waiting to get your desired outcome, contacting Adobe’s customer support service is the best option. You can use This alternative method and ask the airline to cancel your subscription for you.

Wrapping Up 

This article talks about how one can Cancel Adobe Subscription without any fee. It is common not to want to continue a certain membership when you no longer use the services. In this case, most users want to discontinue their membership or cancel it for good. The cancellation procedure is relatively easy but requires users to follow certain steps to complete the membership. We have explained every scenario one can face while doing so and the method to cancel your Adobe Suit subscription in no time. However, if the method mentioned above is not feasible for you, you can try out the other alternative method we mentioned in the guide.

For further details, you can contact us via our official website or by calling us on our official number.

How to Download Adobe Reader for Windows 11 and Mac?

Adobe Reader is a part of Adobe Acrobat. It is used to open, read and print PDFs. Other than that, users can also utilize the software to edit a PDF, convert one document to another pdf, or complete their complex tasks. So if you also want to use this software but don’t know how to install it properly, check the section given below. This blog is a brief guide to download adobe reader for Windows 11 and Mac. So keep reading this blog to grab more details.

How to Merge and Split a PDF Files with Adobe

What are the System Requirements to Download Adobe Reader?

Before running forward for the installation of Adobe Reader, you first have to understand its basic System Requirements:

Specifications For Windows:

  • Intel or AMD Processor in CPU with 1.5 GHz or faster processor.
  • RAM must not be less than 2 GB.
  • The browser should be Internet Explorer 11.
  • The display Screen Resolution needs to be 1024×768.
  • The Hard Disk space must be 450 MB (32-bit). 900 MB/1GB (64-bit).
  • Operating System should be 32-bit Acrobat Reader DC for Windows 11, Windows 10, version 1809 or new version, Windows 8, 8.1, Windows 7 SP1 or Windows Server – 2008 R2, 2012, 2012 R2, 2016 or 2019.
  • For 64-bit Acrobat reader DC, Windows 11, Windows 10, version 1809 or newer, Windows Server 2019, or Windows Server 2016.

Specifications For Mac:

  • CPU must have an Intel processor, with an M1 Apple Silicon processor.
  • RAM should be 2 GB.
  • Operating System must be macOS v10.14, macOS v10.15, macOS v11, or macOS v12.
  • The screen Display Resolution needs to be 1024×768.
  • The browser must be Safari 10.0 or 11.0.
  • Hard Disk Space should not be less than 380 MB.

What are the steps to Download Adobe Reader on Windows 11 and Mac?

After understanding the System Requirements, let’s move ahead and learn how to Download and install Adobe Reader on Windows 11 and Mac devices.

How to Download Adobe Reader on Windows 11?
  1. Go to the official website of Adobe.
  2. Thereafter select the Download button.
  3. Complicate the provided form to select the kind of operating system, language, and version.
    Note: In the field of Operating System, select Windows.
  4. At the time of downloading of File, select the Save button from the notification prompt on your screen.
  5. After downloading, launch that folder and choose the Adobe Reader Installer file that has the name reader DC [xxx] _install.exe.
  6. Tap on the Run tab, and another new dialog box will appear.
  7. The new dialog box will ask you if you want to make some modifications to your System.
  8. Hit on the Yes tab.
  9. Now complete the installation by double-clicking on the Installer button.
How to Download Adobe Reader on Mac?

The process to download Adobe Reader on Mac is similar to the Windows device; you have to go to Adobe’s official website and download it from there only.

However, when asked about the Operating System, you have to choose Mac instead of Windows.

How to Update Adobe Reader?

Now, we can go further and learn the steps to update the Adobe Reader:

Steps to update Adobe Reader on Windows:

  1. Firstly, you have to launch Adobe Reader and head to the Help menu.
  2. Thereon, select the Check for Updates button.
  3. In case the updates are not available, simply close the Reader; otherwise, hit on the Download button.
  4. Now, look for the message that says Update is Ready to Install, and close the Reader before installing it.
  5. Next, look for the Red Adobe icon, and select Install.
  6. Choose the download button and install it when it is successfully installed.
  7. Once the update is completed, hit on the close tab, and select Restart Now.
  8. Repeat the same process until there are no more updates available.
Steps to update Adobe Reader on Mac:
  1. To do an update on Mac, launch the official website of Adobe, and look for the updates and programs button; once you find it click on it.
  2. Tap on this File, and head to the Download button.
  3. Select Download Now, and furthermore, hit on Save to download the File and save its location.
Does Adobe Reader provide a Chrome Extension?

Adobe Reader offers its users a Chrome Extension option as well.

  • In the beginning, move to the Chrome Web Store, and look for Adobe Acrobat.
  • Thereon hit on the Add to Chrome option to add Adobe Reader as an extension to the Chrome Browser.

Ending Note!

Thus, Here we are wrapping up our blog. We hope this blog will guide you in downloading Adobe Reader on your Mac or Windows 11. If you need any further help feel free to get in touch without Adobe Experts. These experts are available 24*7 to help the users in fixing their Queries.

How to Update Dell Driver and Download for Windows 10?

Facing a problem with Windows 10 on your Dell Desktop or laptop? Well, this needs to be solved by updating your Dell drivers. On updating the Dell drivers, your Desktop or Laptop will no longer run dull or sluggish. However, problems with Dell display, audio, touchpad, and other devices is pretty common among the Dell users, but can be rectified with the updated Dell drivers. Take a look at this blog post and learn everything to learn how to update a Dell driver and download for Windows 10.

How to resolve Dell Printer Offline Status on Windows 10?

Are you looking for professional assistance while downloading or updating your Dell drivers? Contact our experts at Connect Helpline for expert guidance.

Easy Ways to Download and Update Dell Drivers for Windows 10

Downloading and updating Dell drivers for Windows 10 is an effortless and instant way to opt for once you’ve stuck with the related issues. Here’s the complete guide for you to learn about the ways for Dell driver updates and downloads.

Method 1 – Download the required Dell Drivers from the official Dell Support Website 

Go to the official Dell Support website and download the verified products for update Dell driver and download for Windows 10. You will get all the verified Dell products from this official website.

Note: You can opt for manufacturer’s website to find the right driver updated products for your device if you are using any third-party hardware device.

1. Navigate to the official Dell drivers and Download the website. After this, find your particular Dell product. For this, you can type the service tag, Express Service Code, product model or ID, etc., and continue to click the Search option.

2. You can also click Browse all Products to identify your Dell product manually. Another option is to click the Download and Install SupportAssist option to install the Dell SupportAssist, and with this, you can automatically find your Dell product information.

3. In the next step, click the Check for Updates option, and Dell will identify available recent Dell driver updates. Once the scan is finished, you need to select the Dell driver updates that you want to download and install.

Method 2 – Update your Windows 10 

You will get many tested drivers for Windows 10 offered by the Dell. Along with this, Dell also offers the latest driver updates for your computers with Windows 10. Therefore, you must consider upgrading your Windows 10 too to install the latest Dell driver and download for Windows 10.

1. First of all, click the Start button and then the Settings option.
2. After this, go to the Update & Security option, followed by clicking the Windows Update button.
3. Now, look for the available Windows updates by clicking the Check for Updates option to update your Windows 10 Operating system.
4. Your Windows will automatically check and download the available drivers for your Dell device.

Method 3 – Update your Dell Driver from Device Manager 

Looking for the latest Dell driver updates for your Dell devices like Dell printer, audio, graphics card, etc.? If yes, try this strategy to update the Dell driver from Device Manager.

1. For this method, you need first to open your Windows 10 device manager and then right-click your Dell graphics, then select the Update driver option.
2. You can also explore various other categories to identify your other devices to update their drivers.

Method 4 – Try to update your Dell Drivers with top driver updater software

You can opt for the option of a reliable or top driver updater software to manage, download, and update your required Dell drivers. Driver Booster, Driver Easy, Driver Talent, and many more choices for the same are available online as well. With this, you can update the drivers and eliminate the issues of your Dell device.

In a nutshell..! 

So, here we have discussed the four ways to update and download the Dell drivers for Windows 10. Try these methods carefully without skipping any of the steps mentioned above. We hope these methods will help you update the Dell driver and download it for Windows 10. If you need further information or help updating your Dell drivers, feel free to contact our professionals at Connect Helpline. Our team will guide every inch related to your Dell drivers professionally.

What are the Common Online Error Messages and How to Fix Them

Fix Error messages of HTTP and know about them thoroughly as they are your real buddies. Believe it or not, as unwanted as they might be, they surely prove to be helpful as they indicate the reason behind such error codes. There are ample number of error messages that you may encounter while you connect to the internet. There could be more than one reason for an HTTP error code. In this blog, we are going to discuss what the HTTP codes are, what are some of the commonly error codes and how can you fix them.

What Exactly are Fix Error messages of HTTP Codes?

Fix Error Messages of HTTP codes are basically the responses issues from the client’s request to the server. For instance, when the web browser tries to connect to the WordPress site, the web browser which is the client is making request to the server which is the WordPress site. Basis how the request sort, the server side shows multiple responses. Redirects, server errors, client errors are such responses. HTTP error codes do not form part of the web pages, they are server responses to how the request is sort.

Dial Toll Free Number : +1-855-356-3099

HTTP error codes are helpful in figuring out what the problem is:

Now that you know what an HTTP error code is, let’s dig into some of the commonly encountered error codes and also understand how these can be resolved.

  • 400 bad request error

If you are trying to access a web page that is not open to the general public or if you fill in the incorrect URL, then you might see a 400 bad request error in your web browser. To fix this particular error, you should make sure that you are typing the correct URL. If still the error persists, you might want to use a search engine like Google to find the page which will more often than not, lead you to the right URL.

system error

  • Network Connection Refused Error

The network connection refused error occurs in three cases. When the website is experiencing loads of unexpected traffic, when it is under maintenance or when it is only accessible by registered users. This particular error usually requires no fixing as this generally is a temporary problem.

You just need to wait for a few minutes or try refreshing the page. It also will make sense to ensure that you have put the accurate url. Although a far stretch, you might want to use VPN and try accessing the page. This could help in cases where the connection is being refused because of your location.

Network Connection Refused Error

  • Unable to locate host error

This particular message can appear in several situations such as: the website being unable to connect with the host server (this could be because of maintenance or bandwidth issues), the network connection has been either lost or impeded, the URL is incorrect. Generally speaking, this error is usually temporary. You need to check the URL for mistakes. Also, try again to contact the server by hitting the refresh button. You must also check the physical network connections to make sure that they are properly attached.

locate host error

  • Host Unavailable Error

The error message Host Unavailable is displayed when the site is unable to connect with the server. The reasons for this could be high unexpected traffic, website maintenance or the site being taken down. Unlike some online error messages, this particular error is not a permanent one. Refresh the page to try accessing the website again, clear your cookies or just wait for some time and try again later.

Host Unavailable Error

  • 401 Unauthorized error

401 unauthorized error message means that the server received an unauthenticated request at its end. This message displays that the page couldn’t load because of invalid credentials for whatever reason it might be. It is possible that the login URL has changed or the entered URL is incorrect. If this is not the case, you need to try clearing the browser cache and cookies.

  • 404 Page Not Found Error

It is possibly the most common error code on the internet. This particular HTTP response is generated when the page that the user is looking for cannot be found on the server. There could be a host of reasons responsible for this particular error code. It could occur because the Webmaster has deleted the page or the entered URL is incorrect. Fixing a broken link is basically an essential maintenance task. One way of doing this is by installing the redirection plugin from the WordPress directory. This can then be redirected to any webpage on the site.

404 Page Not Found Error - Fix Error Messages of HTTP

  • 500 Internal Server Error

There are some generic errors that are displayable when something is wrong with the server. Since, it is a generic error message, there are a number of different causes including issues related to WordPress plugins, PHP issues, database problems and much more. Fixing the 500 Internal Server is a bit tedious as there are multiple reasons to blame for its occurrence.

  • 502 Bad Gateway Error

HTTP error code is different from other error codes. This particular HTTP error occurs when one server on the internet receives an invalid response from the other server. The 502 bad gateway error is displayable on the screen when the server takes more time than the expected to complete the request.

This is fixable  by generally refreshing the browser, clearing the browser cache etc. If you have just moved to the site, try waiting for at least 24 to 48 hours. You can even go to the hosting provider to check with them. Sometimes, a third-party CDN service or WordPress plugin could be causing the servers to give out this 502 bad gateway error. If the solutions provided above don’t work, try switching the WordPress theme to another.

  • 503 Service Unavailable Error

You might be experiencing 503 Service Unavailable HTTP error because of multiple reasons. It is either because the internet connection issues, the site has been delete or moves or the site is experiencing great amounts of unexpected traffic and is temporarily down.
A quick fix for this particular error is checking the URL for issues (maybe you typed it wrong). Also try refreshing the webpage a few times and then rebooting your network hardware.

  • 301 Moved Permanently Error

When a particular webpage is permanently available to a different URL location, the server throws error 301. Although it is not countable amongst the errors per se but still it does communicate important information. This can be on a page-level by pointing you on another similar post(or even homepage) or a domain level.

In order to ensure that the redirection happens without any problems, you need to check the redirect setup. Try switching it with redirection if you, in fact have used the WordPress plugin. If you have used the . Htaccess file to do the redirection, then you need to ensure that you did it correctly. You must keep the domain level redirection for a few months so that the Google knows that the resource is not available  permanently.

  • 302 Found Error

Although similar to the HTTP error code 301 in some ways, 302 Not Found error is a bit different in the sense that it is usable for the temporary redirection. This particular message response tells Google that the page not available temporarily and shall get back to its original URL at some point. It can redirect the user to another URL in moments if it is sort out correctly. One of the easiest ways of setting up a 302 redirect is by using the WordPress plugin. One can easily install and then use the Rank Math from the WordPress directory.

  • 410 Gone Error

The 410 Gone error is eerily similar to the 404 response error. You may also think of it as a permanent 404 error. This code is usable when the webmaster decides to permanently remove a post or page forever or wants to republish it on another site. This particular response tells Google that the requests resource has been, in fact, permanently not available from the internet and shall by no means reappear, making it quite easier to get the page de-crawl or de-index from Google.

There are a host of reasons behind the “410 gone error”. Firstly, you need to check the input URL and ensure that is correct. Thereafter, you need to try debugging the update on the WordPress website. Also, you need to uninstall the WordPress plugins or third-party extensions, if any. If there is a problem at the server end, then none of these might work.

Conclusion:

  • Now that you are aware of the various HTTP error codes and Fix Error Messages and how to sort them, it is time to apply this knowledge on your site and henceforth, improve your site’s user experience and the SEO. We have tried listing Fix Error Messages of Various HTTP error codes apart from the concept of what exactly are HTTP error codes.
  • If you have any queries regarding these, you might want to contact us. We have an in-house team of proficient experts who are very knowledgeable with the functioning of codes and can resolve your queriers in moments. Feel free to get in touch with us through our website connecthelpline.com or shoot a mail at info@connecthelpline.com. We’d be happy to help!

Essential Tips to Resolve ‘Cannot Connect To Norton Server’ Error

To Resolve Norton Server error read our article thoroughly. Norton is known for delivering top-notch and robust security features to safeguard your data from any online threats. Undoubtedly, it is rated as the topmost antivirus software that provides complete security to its users. Despite being an outstanding software, it is not free from technical issues or bugs. One of these errors is ‘Cannot connect to the Norton server.’ which might occur while accessing the software.

Dial our toll free number : +1-855-356-3099

Moreover, this error might pop up due to some connection issues with the network. However, the error does not prevent you from accessing the software; the software will still run correctly. But if this error message is regularly coming on your screen, it might hamper the functioning of your system.

This comprehensive post will discuss the root causes that might evoke the ‘Cannot Connect to Norton Server’ error. We have also elaborated on the simple resolution methods to overcome the error.

Also Read: AOL Password Reset

Want immediate help dealing with the “Cannot Connect to Norton Server” error? Reach out to our highly-trained experts by call or email and obtain the best possible solutions asap. 

Reasons Why Can I not Connect to Norton Server

Knowing the actual cause behind the “Cannot Connect to Norton Server” error will help you to deal with the issue easily. Therefore, we have listed some factors that might lead to the error to make you understand.

  1. Sometimes, the error might appear due to the impartial downloading of the software.
  2. Corrupted Windows system files might be one of the reasons.
  3. This error might happen when you recently changed the Windows Firewall settings.
  4. It might also arise due to the interruption of malicious programs.

Verified Solutions on How to Troubleshoot “Cannot Connect to Norton Server” Error

After knowing the root causes of the error, it is necessary to troubleshoot the issue with the correct troubleshooting methods. Therefore, to help you with that, we have provided you with some easy resolutions. Check them out.

Method 1: Configuration of the Default Web Browser:-

The first and foremost step is to verify that your browser is set as the default browser. To do the same, apply the steps mentioned below.

  • Open the Control Panel window by typing “Control Panel” within the search panel of the Windows menu.
  • Once you reach the Control Panel window, you must set the “View by” category as “Large Icons”. Alternatively, you can also do so by clicking on the drop-down list present at the top-right corner.
  • Now, you have to set your browser as default by clicking on the “Default Programs” option.
  • Eventually, it will take you to the new window where you have to opt for the “Set your default programs” option. Here, you will see all the applications you have set as default.
  • Next, pick the preferred web browser that you want to set as the default browser. Further, hover your cursor over the “Set this program as default”.
  • In the end, tap on the Ok button to save the desired changes successfully. Later, you have to enable the Norton Shield in your web browser using your browser’s Settings section.
Method 2: Fix The Error Using Norton Activation Repair Tool: 

Even after implementing the above solution, if you are facing this error, try the Norton activation Repair Tool to resolve the issue. To use this tool, perform the steps listed below thoroughly.

  • Visit the official website of Norton to get the latest version of the Norton Activation Repair tool.
  • Afterwards, you will see that the repair tool will ask you to relaunch your Windows PC.
  • Once you start your PC again,  re-run the software and check whether the issue is resolved.
Method 3: Uninstall and install the Norton Again: 

If the error still persists, you are supposed to install the software again. Before reinstalling the Norton software, ensure that you have uninstalled the software using the Control Panel. For that, go through the steps discussed below.

  • In the first step, move to the Control Panel by typing it in the search column of the Start menu.
  • Soon after this, take your cursor to the Programs section. Then, you have to click on the “Uninstall a program” option below the Programs section.
  • As a result, it will display the list of all the applications already installed on your system.
  • After that, choose the Norton product from the list of options, right-click on it and click on Uninstall option.
  • In the upcoming screen, click on the “I plan to reinstall a Norton product. Please leave my settings behind”.
  • Then, you have to click on No, thanks if you get the advertisement, and tap on Next to uninstall the Norton software.
  • You have to wait until the uninstallation of the Norton software gets completed. Later on, click on the Restart Now” link.
  • Afterwards, download the latest version of Norton software and go to the download folder to open it on your screen.
  • Run the downloaded setup file and then review the terms and conditions of the License Agreement. Further, you have to select the highlighted “Agree & Install” option.
  • With this, the installation of the Norton software is completed. Now, you are free to utilize this software without getting any issues.
Method 4: Install and Run Norton “Remove and Reinstall” Tool

The Norton Remove and Reinstall tool is used to repair the damage in the installation of the software. Therefore, running this tool can resolve the Cannot Connect to Norton Server issue. Perform the steps listed below to run the “Remove and Reinstall” tool.

  • Initially, you have to download the latest version of the Norton Remove and Reinstall tool from the official website of Norton.
  • After this, save the downloaded setup file to the preferred location where it is easily located on your desktop.
  • Now, access your default download folder and double-click on the downloaded file to open it.
  • You are supposed to follow the instructions on the screen to complete the installation of the tool.
  • At last, relaunch your system and check whether the issue still exists.
 Method 5: Verify Your Norton Service Status

There might be the possibility that the users might encounter “Unexpected Browser error” or “Cannot connect to the server error” due to the service interruption. Therefore, to resolve the issue you have to look at the status of your Norton Service. For that, you have to apply the instructions listed below.

  • Initially, open your web browser and access the Norton Service Status page.
  • After this, if you discover any issues regarding any of your Norton products then you have to wait until the service is running.
  • Furthermore, if you are witnessing a problem, In that scenario, you have to visit the Norton Services Status Help.

Resolve “We cannot Connect to the Norton Server at this Point , Try Again Later”

At times, the users get the error message that “We cannot connect to the Norton server at this moment. Try again later” while activating the antivirus application. Therefore, to get rid of the issue, you have to run the LiveUpdate by following the steps listed below.

  1. Initially, you have to launch your Norton device security product.
  2. Now, look at the notification area and then right-click on the Norton icon.
  3. After this, select the highlighted Run LiveUpdate option.
  4. Once the process of Norton LiveUpdate is over, you must hit the Ok button.
  5. Run LiveUpdate until you get the message indicating that “Your Norton product has the latest protection updates” on your screen.
  6. Next, exit from all the programs and then relaunch your system. Try to use the Norton software again and verify if the error still exists.

Wrapping It Up!!

We hope that you may find this post informative and that now you can easily resolve the “Cannot Connect to Norton Server” error. However, if you still encounter issues while resolving the error, then connect with our experts. You can communicate with our experts through email or live chat and obtain the best possible solutions to eliminate the error.

AOL Mail Smart Features

AOL Mail Smart Features helps users easily identify the things like keywords etc. It manages and does the heavy lifting things for the users. These AOL Email features have numerous advantages that we have talked about in the given blog. So let’s start the discussion and learn about it in detail by following this blog.

Need help in understanding AOL Mail features and actions? If yes, dial our toll-free number, and grab the best help possible.

Brief about AOL Email Features

The AOL that we are talking about is completely different from the actual and traditional AOL email Program because it doesn’t require any specific software to access the email. Moreover, it is also available for free for everyone, including non-AOL Subscribers. Somewhat the same as other webmail programs, AOL user can use their mail using standard browsers like Firefox, Internet Explorer, Chrome, Safari, etc.

The AOL Email Features users have the option to log in to their email through mail.aol.com. When they reach this page, they simply have to provide login information and start sending emails as well. Alternatively, users also have the option to download AOL’s software. The newest version of the software is called AOL Desktop. It is a free-of-cost email service app that focuses mainly on the web mail form of AOL mail.

As part of its transition from a subscriber-based service to a Web portal, AOL introduced AOL Mail. By 2005, Yahoo, MSN, and Google had already made a name for themselves as free Web portals where users could access web-based email, instant messaging, and calendar programs as well as catch up on the latest news. AIM Mail used to offer almost 2GB of free storage, which was a significant amount at the time. This is when AOL understands that it needs a boost to win its customers again in the Web portal competition. However, now all AOL Mail accounts now come with unlimited storage.

Now to know more about the features of AOL Mail, keep reading this blog.

What is the Difference Between AOL Mail and AIM Mail?

To access the AOL Mail account, you can easily Sign up your AOL Mail account using mail.aol.com. Simply click on the Get Free AOL Mail button, and choose your account’s email address and password. Apart from that, scrolling through the headlines occupies more screen space. You’ll see a list of icons and folders there, with Inbox at the top. All of the emails you’ve received are kept in your Inbox. You can access the inbox view, a chronological list of received emails arranged from newest to oldest, by clicking the inbox icon. Click on an email in the Inbox to read it; it will then open. The top of the window is where you can find all the fundamental operations for handling and responding to emails.

Whereas, if a user has an AIM Screen name, you can log in with that and an AIM password as well. On the basis of your screen name, you will get an AIM Mail Address. Accessing any feature in AIM is a bit difficult.

What are the Basic Operations for Handling and Responding to Email?

The fundamental and basic operation to handle and respond to an email is mentioned below:

  1. You can reply to a message to the sender or to all of the recipients.
  2. Forward enables you to send the email to a different recipient.
  3. Advanced organizational options like identifying a message as new, flagging it, moving it to other folders, printing it, etc. are available through the Action button’s pull-down menu.
  4. The mail is deleted and moved to your Trash folder, which is also on the left.
  5. The mail is sent to your Spam folder as spam, which will help AOL Mail detect more spam in the future.
  6. Either click “Reply” to an existing message or the “Compose” button at the upper left of the screen to start a new email.
  7. You may alter fonts, text and background colors, text alignment, and more with AOL Mail’s comprehensive text formatting palette.
  8. These resources are visible directly above the sizeable text box.
  9. Using the Attach File button, you can attach any type of file, including images.
  10. Additionally, you can use the Spelling button at the window’s top to proofread your message.
  11. To view recommended repairs for misspelled words, click on them.
  12. To send your message, click the Send button at the top of the screen once the work is complete.
  13. You can also store the message in your Drafts folder on the left by clicking the Save Draft button if the message is not ready.
  14. Two icons for Contacts and Calendar are located underneath the trash folder. The address book in other email applications is equivalent to contacts.
  15. A new window will open when you click on Contacts, allowing you to add new contacts.

Related Article:  AOL Account Subscription

Use AOL Mail Smart Features

Smart Features tools are a way to make the use of AOL Mail more streamlined and effective while also saving some time. By enabling Smart Features, AOL Mail users can recognize things like keywords and carry out labor-intensive tasks on users’ behalf.

1. AOL Mail for Desktop Smart Features

  • The subscription section, where users can manage the subscription easily.
  • Just a single tap is needed to unsubscribe from email lists.
  • Better Contacts settings that can automatically extract the contact details and house address using the emails from the contacts.
  • Your collection of mail attachments can be seen in the photos and documents displayed.

2. AOL Mail App Smart Features

  • Rich Contact cards along with the phone number and email addresses of all the user’s contact.
  • The attachments section, in which all the sent or received attachments are available.
  • The subscription section is where you can handle the subscription easily.
  • You can unsubscribe to an email with just one tap.

3. AOL for Mobile Webmail Smart Features

  • In this, also subscription view is present to help you unsubscribe from the list of emails.
  • Note: In case you can’t see any feature in AOL Mail, this means it is not available in your locale.

Conclusion!

At this point, our blog on AOL Smart features is ending. If you want any further help to understand AOL Mail features and actions. Feel free to contact our AOL Experts by either using the live chat option or email. If you opt for email, you have to wait for some time to get the revert, but with live chat, the representative will resolve the problem immediately.

11 Effective Fixes for AOL Mail Blerk Error 5

AOL is the topmost email service provider that allows you to share images, files, and other important documents. It also helps improve the overall email service experience by delivering top-notch mailing features. Regardless of being an outstanding mailing service, it is bound to certain technical issues and glitches. AOL Mail Blerk Error 5 is one such error that occurs while loading emails from this email service.

However, to know more about this error, read the entire post attentively and get immediate assistance to your query.

Getting issues while fixing AOL Mail Blerk Error 5 and need expert’s help? 

Dial Our Toll Free Number : +1-855-356-3099

Reasons Why You End Up With AOL Mail Blerk Error 5

The users might confront AOL Mail Blerk Error 5 while loading messages in the AOL server. Apart from this, the users might lead to this error due to numerous reasons. Read the following points attentively to understand the root cause of the issue.

  • Misconfiguration of the Internet settings may lead to AOL Mail Blerk Error 5.
  • In other instances, it may appear due to the storage of unwanted browser or cache files.
  • Sometimes, the antivirus software interrupting AOL might lead to this error.
  • You might get this error due to saved incorrect bookmark addresses.

Related Page: AOL Error 212

Simple Tricks to Handle Blerk Error 5 in AOL Mail

After going through the root causes that may trigger AOL Mail Blerk Error 5, you must proceed further to the troubleshooting section. Following are the quick resolution solutions using which you can fix the error instantly without making much effort.

1st Solution: Stop the Third-Party Cookies Of Your Browser

Sometimes, the users often get AOL Blerk Error 5 because of the corrupted data stored in their browser. Therefore, you must disable the third-party cookies entering your web browser to rectify the issue.

  • Launch your web browser and tap on the menu icon at the top-right corner.
  • Following this, you must choose the highlighted Settings option.

AOL Blerk Error 5 - Settings

  • Consequently, it will open the Browser Settings on your computer screen. Then, move to the Privacy and Security section.
  • Soon after this, search for the section named “Cookies and Other Site Data” and tap on it.

AOL Blerk Error 5 - Cookies and Other Site Data

  • Finally, navigate and tap on the Block Third-Party Cookies option.

AOL Blerk Error 5 - Block Third-Party Cookies

2nd Solution: Remove the Unwanted Cookies and Cache Files
  • Initially, launch the Google Chrome browser on your device.
  • After this, tap on the three vertically placed dots present at the top-right corner of the screen. Further, opt for the Settings option to proceed further.

top-right corner of the screen

  • Afterward, move to the Privacy and Security tab and head toward the Clear Browsing Data section.

AOL Blerk Error 5 - Cookies and Other Site Data

  • As a result, the window that represents the browsing data will launch on your computer screen. Here, you must choose all three options to clear cookies, cache files, and browsing history. Moreover, you can set the time frame from where you wish to remove the data from the Time Range option.

AOL Blerk Error 5 - choose all three options and Time Range

  • Ultimately, opt for the highlighted Clear Data button to accomplish the process.
3rd Solution: Allow the Enhanced Protection Mode Into Your Web Browser
  • In the beginning, launch the web browser on your computer.
  • After this, hit the Hamburger menu, represented by three dots in the screen’s top-right corner. Then, opt for the Settings option from the drop-down menu list.

Settings

  • Following this, head toward the Privacy and Security tab at the Settings page’s left sidebar.

AOL Blerk Error 5 - Cookies and Other Site Data

  • Now, move towards the Security section and pick the highlighted Enhanced Protection option.

Enhanced Protection

4th Solution: Upgrade Your Web Browser

Sometimes, using the obsolete web browser version might lead to the AOL Mail Blerk Error 5. Therefore, to avoid this issue, you must verify that you are not running the older browser version. If any updates are available.

  • In the initial stage, launch the web browser on your device and tap on the Hamburger menu icon.
  • Soon after this, move to the Help menu and then opt for the About Google Chrome option from the upcoming menu.

AOL Blerk Error 5 - About Google Chrome

  • Subsequently, a pop-up window will appear, where it will automatically look for any recently launched updates. Moreover, it will present you with the web browser version you are presently using if it’s already updated. If it’s not updated, the updates will begin downloading on your device.

Updating Google Chrome

  • Once the downloading process is over, you will get the Relaunch button.

AOL Blerk Error 5 - Relaunch

5th Solution: Temporarily Turn-Off the Browser Add-Ons
  • Sometimes the add-ons/extensions/plugins are also one of the most common reasons that might lead to AOL Mail issues. If you accidentally installed a malicious add-on that obstructs your personal data, it may lead to AOL Mail errors.
  • So, to resolve the issue, switch off each extension one by one and launch your AOL Mail account. Apart from this, if you get any harmful extension, uninstall it permanently by right-clicking on its respective icon. Further, opt for the highlighted Remove from Browser option.

AOL Blerk Error 5 - Bookmark Manager

6th Solution: Modify the Bookmark URL Address of AOL Mail

With time, AOL Mail URL also changed so the older one is not valid anymore. Therefore, if you use the bookmarked AOL Mail URL to access the mail, you won’t be able to access the website. Thus, it might lead to Blerk Error 5 in AOL.

  • Firstly, launch the web browser on your device and then tap on the three vertically placed dots placed at the top-right corner.
  • Pick the Bookmarks option from the menu, and then opt for the Bookmark Manager from the extended list of options.

Bookmark Manager

  • Now, navigate to the AOL Mail Bookmark and tap on the three-vertically placed dots located next to it.

AOL Blerk Error 5-three-vertically placed dots

  • Thereafter, tap on the Edit option from the menu.

AOL Blerk Error 5 - Edit

  • Next, within the Edit window, paste the appropriate URL within the URL section and then click the Save button.

paste the appropriate URL within the URL section

7th Solution: Examine the AOL Mail Server Settings:-
  • Usually, when the user encounters the issue, it represents an error message stating: “There was a problem saving the message”. The users might come across this issue while attempting to send an email. Wondering why it happened? It might occur due to your email service’s misconfigured AOL SMTP, IMAP settings.
  • The users must check that the IMAP Server name must be set as imap.aol.comPort, Port Number as 993 of the incoming mail server. On the other hand, the outgoing mail server name must be smtp.aol.com, Port Number 465.
  • On the other hand, the server name of POP incoming mail is pop.aol.com and port number 995. Whereas the outgoing server name is set as smtp.aol.com, and port number to 465.
8th Solution: Turn-Off Ads and Pop-up Blocker

There are certain instances when some internal settings of AOL Mail obstruct you from accessing the mail account. However, if you use an add-on or pop-up blocker, launch an Incognito window. After that, opening your AOL Mail is the easy way to fix the issue.

9th Solution: Disable the Antivirus Program For Sometime

At times, the third-party security programs and the firewall programs might be the reason that triggers this issue. Therefore, to fix the issue, try disabling the antivirus program for a few minutes and then try again to access your account.

10th Solution: Verify Your Internet Connection & Attachment Size

Sometimes, if you experience that you won’t be able to send the emails, you have to keep the outgoing mails in your Outbox. Moreover, if you find that AOL Mail got stuck in the Outbox for a longer time and receive the issue, look for your internet connection. Moreover, you must ensure that the Outbox must have enough space to add the attachments.

11th Solution: Consult With The AOL Support Experts

Sometimes, it gets quite frustrating for the users when they face difficulty while accessing the AOL Mail account. However, you can resolve it by contacting the AOL support experts, who will assist you with the proper solutions to overcome the issue instantly.

Related Page: How To Migrate Verizon Email To AOL?

Summing It Up!!

Here, we have arrived at the end of this post, and we assure you that now you can easily deal with AOL Blerk Error 5. However, if you require further assistance, contact our experts through a live chat facility.

AOL Email Sending Problems

Are you facing AOL Email sending Problems from your AOL email account? If yes, this problem has to be fixed immediately, as it can even hinder your professional work. There can be multiple reasons why you may face AOL mail sending problems.

Well, if you are also facing this issue and looking for a solution to get rid of it, then this comprehensive guide will be important for you. In this post, we covered a summary of things that can help you to fix the email sending problems in your AOL email account. So, let’s dive in-depth and discuss the solutions that you can follow to resolve the error.

Why Is My AOL Mail Not Sending Emails?

Let’s discuss the possible reasons due to why a user may encounter the AOL mail not sending emails problem.

  • When you are accessing the email account in an outdated web browser, then it can also be a reason due to why the problem arises.
  • Incorrect AOL email account settings.
  • Browser’s history, cache, and cookies.
  • The attachment that you have uploaded in the email is too large in size.
  • Your AOL email account has been blocked due to sending too many spam emails.
  • Recipient has added your email address in the block list.
  • Providing wrong login credentials for the email account.
  • Due to heavy traffic, the AOL email server is down.
  • The email address that you have entered in the sender’s address is incorrect.

How to Fix AOL Mail Not Sending Problem?

Here are the tried and tested solutions that you can follow to resolve the AOL mail not sending problem.

Solution 1. Restart your PC

We recommend this solution at the top because restarting the PC will clear up some storage space in its internal memory or RAM. Freeing up the storage in the PC’s RAM will help you fix many technical glitches, and the AOL mail not sending problem is among them.

Given below are the steps that you can follow to restart your PC;

  • First of all, close all the running applications on your device.
  • Thereon, press the “Alt+F4” keys together on your keyboard.
  • Now, the shutdown windows will appear on your screen.
  • After that, you have to click on the drop-down arrow icon and then select the “Restart” option.
  • Thereon, you have to click on the “OK” option to complete this process.

After successfully restarting your device, launch the compatible web browser again and log in to your AOL email account. If you are still unable to send new emails from your email account, then move to the next solution.

Solution 2. Verify the AOL Mail Server Status

When the AOL email server is down for maintenance, users might face problems sending new emails from their AOL email accounts. In that scenario, users won’t be able to use all the features of their AOL email account.

You can visit various online server detector websites, such as down detector to check if there is a server issue with the AOL email services.

Solution 3. Disable Firewall Settings on Your PC

The firewall software is essential to keep your PC safe and secure from malware threats. However, sometimes this firewall software can cause some compatibility issues and may even lead to various technical glitches.

The background active antivirus software can also be a major reason why the AOL mail not sending issue arises. Therefore, you can resolve this issue by temporarily disabling the firewall settings. Given below are the steps that you can follow to disable firewall settings on your PC;

  • First of all, navigate to the windows start menu on your PC.
  • Thereon, type “Settings” in the search box, and then under the search results, double-click on the settings option.
  • Under the windows settings page, select the “Update and Security” option.
  • After that, click on the “Windows Security” option and select the “Firewall and Network Protection” option.
  • Moving ahead in the procedure, navigate to the windows security settings on your device.
  • Now, you must select the network profile and end this process by turning off the “Windows Defender Firewall” option.

After you have disabled the windows firewall settings on your device, then re-login to your AOL email account and verify whether you can compose a new mail or not. If you still face the error, move to the next solution.

Solution 4. Delete Browser’s History and Cache

Deleting the web browser’s history, cache and cookies is a one-go solution for eliminating various online technical glitches. The AOL mail not sending issue can also be resolved by this method.

Below are the steps you can execute to delete the browser’s history and cache.

  • At first, double click on the Google Chrome application icon on the desktop screen to open it.
  • Press the “Ctrl + H” keys together, and then you will be redirected to the history page.
  • After that, you have to click on the “Clear Browsing Data” option, which is available on the top left side of the screen.
  • Click on the “Advanced” tab option and check mark all the boxes. [Make sure to change the time range to the “All Time” option.]
  • After that, click on the “Clear Data” option.

Once you have cleared the browser’s history and cache, then access your AOL email account and verify if the AOL email not sending problem has been fixed or not.

Solution 5. Check the Sending Limit of Your AOL Email Account

Every email service has predefined sending limits when composing and sending new emails. If you have already crossed the sending limit for that day, you will not be able to send new emails.

If you have met your daily limit, you will get a notification about it and show you the waiting time to send a new mail. You only have to wait till the instructions get removed as time passes.

Find Related Page: AOL Mail Smart Features

Some Other Steps To Fix the Problems

Let’s look at some of the easiest troubleshooting you can perform to resolve the AOL mail sending problems.

  • Use a high-speed internet connection.
  • Reset the browser’s settings to default.
  • Download the new windows update.
  • Always use an updated and compatible web browser to access the email account.
  • Change the login password of your AOL email account.
  • Check the AOL email account server settings.
  • Disable the email forwarding option.

Concluding:

We hope that by following the solutions mentioned above, you have successfully eliminated the AOL Mail Sending Problems. However, if you further need any help related to the AOL email account, then our team will be happy to have a word with you. Our experts and professional email experts are available 24/7 at the help desk to resolve your query.

How to Fix “AOL Mail Error Code 475”?

E-Mailing is an instant process that has now become a necessary utility for working professionals. The formal structure while writing an e-mail is the reason that every communication held at a professional level should be in the form of an e-mail. However, sometimes there may be a chance of technical error, which can stop the flow of communication and create a hindrance in the workflow. One common error is the AOL Mail Error code 475, which might occur when there are some suspicious activities detected on your system. Here we will discuss various causes which can cause this error and various measures to deal with them.

Dial Toll Free Number : +1-855-356-3099

What is the AOL Mail Error Code 475?

This is a common error you may face by various service providers, when there is a detection of any suspicious activity from the sender side. Chances of suspicion being detected from your system can rise when you use the same or duplicate content various times for multiple purposes.

Need quick assistance in AOL Mail Error Code 475? Call us at 1-855-356-3099 and interact with our professionals to find effective solutions for your problem error.

Related Error: AOL Service Error

Various Reasons for AOL Mail Error Code 475

AOL Mail Error Code 475 occurs when you:

  • Send multiple e-mails within a very short duration of time.
  • Send exactly the same e-mail/duplicate mail to various recipients at a time, or you can SPAM activity.
  • When so many e-mails get stuck in your outbox or draft folder.
  • When there is a virus on your system.

How to deal with AOL Mail Error Code 475

Now that we know the common causes for AOL Mail Error Code 475, we can look for each of these causes step-by-step, as discussed below:

Delete AOL e-mails from the outbox or draft folder:

This might sometimes happen that due to poor connectivity, various e-mails are not sent; instead, they get landed in the outbox folder. To handle  this issue, follow the given steps:

  • Go to the outbox folder.
  • Select the unsent e-mail that you wish to delete.
  • Click on the delete icon, and after that, check whether your account is still lock or not.

Change AOL e-mail password:

Try to change credentials, i.e., your password, which can be an indication that you are taking a preventive measure to make your account secure and try again. Follow the given steps to change your AOL account password:

  • Login to your AOL account.
  • Click “Account Security” and click on “change the password” option.
  • Enter a new password and save changes.

Create a Free AOL Email Account

Patience is the Virtue:

Sometimes, all you can do is wait for a specific period of time (minimum 12 hours) and afterward check again whether your account is still lock or not. Additional measures to solve AOL Mail Error Code 475. Sometimes, the possible cause for this error is that you might have accidentally deleted registry files or haven’t updated the system drivers. In that case, you need to follow the given steps:

  • Check out for “window updates.”
  • Right-click on the “Windows” button.
  • Click on the device manager.
  • If there is any pending update, yellow exclamation mark will indicate it. Thus check out the Yellow exclamation mark.
  • Double on the exclamation mark and click update drivers.

Read to Resolve Similar Error : Fix Error Code 420

Conclusion:

We hope that with the help of the information provided you might be able to tackle the issue of AOL Mail Error Code 475. However in any case, if you are still unable to overcome this error, you can always directly interact with our experts through live chat options available. Feel free to drop the message anytime and we will be happy to assist you.